
Setting up a website on Hostinger shared hosting is simple. Follow these steps to get started.
Creating a website can seem daunting, but Hostinger makes it easy. Their shared hosting plans are user-friendly and affordable. This guide will walk you through the setup process. From registering your domain to installing WordPress, we cover every step. With Hostinger, even beginners can launch a website quickly.
By the end, you’ll have a fully functional site. Let’s get started on your online journey!
Credit: www.hostinger.com
Getting Started
Setting up a website on Hostinger’s shared hosting is simple. This guide will help you get started quickly. Let’s dive into the essentials.
Creating A Hostinger Account
First, you need to create an account. Follow these steps:
- Visit the Hostinger website.
- Click on the “Get Started” button.
- Fill in your email and password, then click “Sign Up”.
Once you complete these steps, you have a Hostinger account. Easy, right?
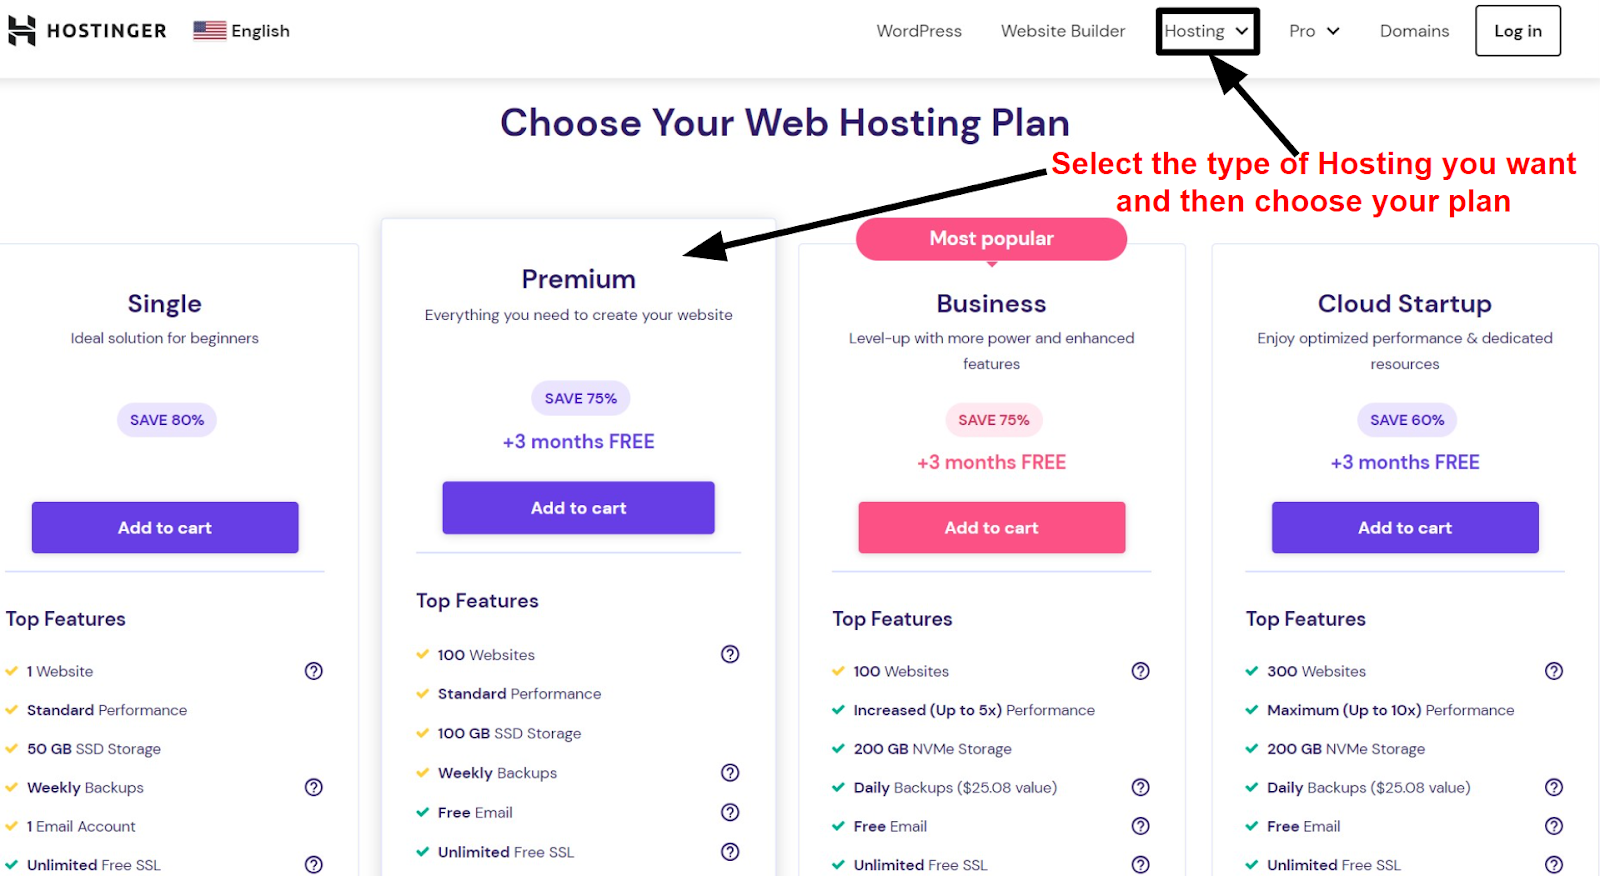
Choosing The Right Plan
Now, it’s time to choose a hosting plan. Hostinger offers several plans. Here’s a quick overview:
| Plan | Price | Features |
|---|---|---|
| Single Shared Hosting | $1.99/month | 1 Website, 30 GB SSD Storage, 1 Email Account |
| Premium Shared Hosting | $2.99/month | Unlimited Websites, 100 GB SSD Storage, Unlimited Email Accounts |
| Business Shared Hosting | $3.99/month | All Premium Features + Daily Backups, Free CDN |
For beginners, the Single Shared Hosting plan is great. If you need more features, consider the Premium or Business plans.
Follow these steps to select a plan:
- Log in to your Hostinger account.
- Go to the Hosting section.
- Choose your desired plan.
- Complete the payment process.
Now, you are ready to set up your website. Stay tuned for the next steps in our guide.

Credit: www.crazyegg.com
Domain Registration
Setting up a website on Hostinger shared hosting involves a few key steps. One of the crucial steps is domain registration. A domain is your website’s address on the web. You can either register a new domain or connect an existing one. Let’s explore both options in detail.
Registering A New Domain
To register a new domain with Hostinger, follow these steps:
- Log in to your Hostinger account.
- Navigate to the Domains section.
- Type your desired domain name in the search bar.
- Check if the domain is available.
- Select the domain and proceed to checkout.
- Complete the payment process.
After registering, the domain will automatically be linked to your Hostinger account. You can manage it from the dashboard.
Connecting An Existing Domain
If you already have a domain, you can connect it to your Hostinger account. Here’s how:
- Log in to your Hostinger account.
- Go to the Domains section.
- Select Use Existing Domain.
- Enter your current domain name.
- Update the DNS settings to point to Hostinger’s servers:
| Record Type | Value |
|---|---|
| A Record | Insert Hostinger’s IP Address |
| Nameserver 1 | ns1.dns-parking.com |
| Nameserver 2 | ns2.dns-parking.com |
Make sure to save the settings. Changes might take up to 24 hours to propagate.
By following these steps, your existing domain will be connected to your Hostinger account. You can now proceed to set up your website.
Setting Up Hosting
Setting up your website on Hostinger’s shared hosting is a simple process. With user-friendly tools and a straightforward interface, you’ll get your site up and running in no time. Follow these steps to make your hosting setup smooth and efficient.
Accessing The Control Panel
First, log in to your Hostinger account. Once logged in, you will see your dashboard. Click on the “Hosting” tab to view your hosting plans. Select the plan you want to use for your website. Then, click on “Manage” to access the control panel.
In the control panel, you will find all the tools you need. These tools help you manage your website, domain, and files. The control panel is designed to be user-friendly and easy to navigate.
Navigating The Dashboard
Once in the control panel, you will see your dashboard. The dashboard is your main hub for managing your website. Here, you can find shortcuts to essential features like file management, databases, and email accounts.
Explore the dashboard to familiarize yourself with the various tools available. You can also find tutorials and guides that help you understand each feature. These resources are helpful if you are new to website management.
With a clear and organized layout, the dashboard makes it easy to find what you need. This ensures a smooth and efficient setup process for your website on Hostinger shared hosting.
Installing WordPress
Set up your website on Hostinger Shared Hosting by installing WordPress. Use their one-click installer for a quick start. Follow the prompts to complete the process easily.
Setting up a website on Hostinger shared hosting involves installing WordPress. This process is straightforward and can be done in two ways. You can use the auto installer or go for a manual installation. Both methods are easy to follow. Let’s dive into each method.Using Auto Installer
Hostinger offers an auto installer for WordPress. It simplifies the installation process. First, log in to your Hostinger account. Go to the control panel. Look for the “Website” section. Click on “Auto Installer.” In the search bar, type “WordPress.” Select WordPress from the list. Click the “Install” button. You will be prompted to fill in some details. Enter your website name and admin credentials. Click “Install” again. The system will handle the rest. Wait for a few minutes. Your WordPress installation will be ready. You can now start customizing your website.Manual Installation
Manual installation gives you more control. First, download the latest WordPress version from the official website. Next, log in to your Hostinger control panel. Go to the “File Manager.” Upload the WordPress zip file to your public_html directory. Extract the zip file. Now, create a MySQL database. Go to the “Databases” section in the control panel. Click on “MySQL Databases.” Create a new database and user. Note down the database name, user, and password. Now, go back to your File Manager. Find the wp-config-sample.php file. Rename it to wp-config.php. Open this file and edit it. Enter your database details. Save the changes. Now, go to your website URL. You will see the WordPress setup page. Follow the on-screen instructions. Complete the setup. Your WordPress is now installed. Start building your website. “`Configuring Website Settings
After setting up your website on Hostinger Shared Hosting, it’s crucial to configure the website settings. This step ensures your website looks professional and functions smoothly. This section will guide you through customizing the appearance and setting up plugins.
Customizing Appearance
Customizing your website’s appearance is essential to make it unique. Start by selecting a theme that aligns with your brand. Here’s how you can do it:
- Log in to your WordPress dashboard.
- Navigate to Appearance > Themes.
- Click on Add New to browse available themes.
- Choose a theme and click Install.
- After installation, click Activate.
Once your theme is active, you can further customize it:
- Go to Appearance > Customize.
- Adjust the settings for colors, fonts, and layout.
- Preview changes and click Publish to save.
Setting Up Plugins
Plugins extend the functionality of your website. Installing essential plugins can enhance performance, security, and usability. Follow these steps to set up plugins:
- Access your WordPress dashboard.
- Navigate to Plugins > Add New.
- Search for the desired plugin using the search bar.
- Click Install Now next to the plugin.
- After installation, click Activate.
Some recommended plugins are:
- Yoast SEO: Helps with search engine optimization.
- Akismet: Protects your site from spam.
- WP Super Cache: Improves site speed.
- Contact Form 7: Creates contact forms.
To configure a plugin, go to Settings under the plugin name and adjust as needed.
Managing Content
Managing content is essential for your website’s success. Once your site is live, you need to create and organize content. This keeps your visitors engaged and helps your site rank well in search engines. Let’s explore how to manage content on Hostinger Shared Hosting.
Creating Pages And Posts
Creating pages and posts is simple with WordPress. Pages are static and suit content like ‘About Us’ or ‘Contact’. Posts are dynamic and perfect for blogs.
To create a page, go to your WordPress dashboard. Click on ‘Pages’ and select ‘Add New’. Enter your page title and content. Hit ‘Publish’ when done.
For posts, navigate to ‘Posts’ in the dashboard. Choose ‘Add New’. Add your title, content, and categories. Once ready, click ‘Publish’. It’s that easy.
Organizing Menus
Menus help visitors navigate your site. To create a menu, go to ‘Appearance’ and select ‘Menus’. Click ‘Create a new menu’. Name your menu and click ‘Create Menu’.
Next, add pages or posts to your menu. Check the items you want to include. Click ‘Add to Menu’. Drag and drop to organize. Save your menu when finished.
You can also create dropdown menus. Drag a menu item slightly to the right under another item. This makes it a sub-item. Save your changes.
Security And Backup
Security and Backup are critical aspects of running a website. Ensuring that your site is secure and that you have reliable backups can save you from data loss and security threats. Here’s how you can set up robust security and backup measures on Hostinger Shared Hosting.
Implementing Security Measures
To protect your website, start by installing an SSL certificate. Hostinger offers free SSL certificates for all plans. This encrypts data between your site and its users, boosting security.
Next, enable the Web Application Firewall (WAF). A WAF helps block malicious traffic and prevent attacks. You can enable this from the Hostinger control panel.
Utilize two-factor authentication (2FA) for added security. This requires a second form of verification when logging in, making unauthorized access more difficult.
Another vital step is to regularly update your website’s software. This includes the CMS, plugins, and themes. Updates often include patches for security vulnerabilities.
Setting Up Automatic Backups
Backups are your safety net. Hostinger offers an easy way to set up automatic backups.
In the Hostinger control panel, navigate to the Backups section. Select the frequency of your backups—daily, weekly, or monthly. Frequent backups are better as they minimize data loss.
You can also enable remote backups. This means your backups are stored on a different server, adding an extra layer of safety.
Always verify your backups. Check that they are complete and can be restored. This ensures that you can recover your website if needed.
Below is a table summarizing key security and backup features:
| Feature | Description |
|---|---|
| SSL Certificate | Encrypts data between your site and users |
| Web Application Firewall (WAF) | Blocks malicious traffic |
| Two-Factor Authentication (2FA) | Provides added login security |
| Software Updates | Patches for security vulnerabilities |
| Automatic Backups | Regularly scheduled backups |
| Remote Backups | Backups stored on a different server |
By implementing these security measures and setting up automatic backups, your website will be better protected against threats and data loss.
Credit: www.websiteplanet.com
Launching Your Website
Launching your website is an exciting step. After setting up your Hostinger shared hosting, it’s time to go live. This section will guide you through the final steps to ensure everything is perfect.
Final Checks
Before launching, perform a thorough check of your website. Ensure all links work and pages load quickly. Look for any broken images or missing content.
- Test all internal and external links
- Check for broken images
- Review content for errors
- Ensure all forms are functional
Use online tools to check your site’s loading speed. A fast website improves user experience and SEO ranking.
Going Live
With the final checks complete, you are ready to launch. First, ensure your domain is connected to your hosting account. This step is crucial for your site to be accessible.
- Log in to your Hostinger account
- Navigate to the “Domains” section
- Select your domain and manage DNS settings
- Update the DNS records to point to Hostinger’s servers
Once the DNS changes propagate, your site will be live. This process may take up to 48 hours.
Finally, promote your site on social media and other platforms. Encourage visitors to check out your new website.
Frequently Asked Questions
How Do I Start Setting Up My Website?
Begin by purchasing a domain and a shared hosting plan from Hostinger. Use Hostinger’s control panel to connect your domain and install a website builder or CMS like WordPress.
What Is Hostinger Shared Hosting?
Hostinger shared hosting is a web hosting service where multiple websites share server resources. It’s cost-effective and suitable for small to medium-sized websites.
How Do I Install WordPress On Hostinger?
Log in to your Hostinger account, navigate to the control panel, and use the one-click installer to set up WordPress.
Can I Migrate My Existing Website To Hostinger?
Yes, Hostinger provides tools and support to help you migrate your existing website. Follow their migration guide for a smooth process.
Conclusion
Setting up a website on Hostinger shared hosting is simple and efficient. Follow the steps outlined, and you’ll have your site live in no time. Choose a domain, set up your hosting account, and install WordPress. Customize your site and add content.
Regularly update and maintain your website for the best performance. Hostinger’s tools and support make the process easier. Enjoy building and growing your online presence with confidence. Happy hosting!